Warp is a new high-performance terminal built entirely in Rust that makes you and your team more productive and the CLI easier to use. The input editor for commands is a full text-editor that supports selections, cursor positioning, and shortcuts like you are used to in other apps. Commands and their output are visually grouped into blocks, and existing shortcuts like up-arrow and ctrl-r have new visual menus to make them easier to use.
In this article, I walk through how we built the foundation of Warp: the UI, blocks, and the input editor. Building this foundation ultimately helped us unblock even more exciting features that we’re launching in the coming months, like infinite history, real-time collaboration, and shared environment variables.
Designing Warp required us to be intentional about our stack at nearly every level. At the start we had a key requirements:
Speed: Speed is critical when using a terminal, especially for commands that can have a lot of output. In practice, this means Warp should always be running at 60fps even on 4K or 8K monitors.
Compatibility with Existing Shells: Warp needs to work with popular existing shells like Bash, ZSH, and Fish and with existing keybindings.
Multiplatform, including supporting the Web: Warp needs to run on multiple platforms, including rendering Warp in a browser to support real-time collaboration.
Integration with shells to support blocks (including over SSH): To support features like blocks, Warp needs to be able to integrate deeply with the current running session in the shell.
Arbitrary UI elements: Unlike traditional terminals that mostly just render characters, Warp needs to render arbitrary UI elements (snackbars, overflow menus, etc). This is critical to our vision of making the terminal more accessible and functional.
Native and Intuitive Editing: Warp needs a full text editor to support intuitive editing (e.g. selecting text, cursor positioning, and multiple cursors) that users are familiar with from other modern applications.
Rust + Metal
One of the most important priorities when building Warp was speed. Many terminals built on Electron are capable tools but can quickly lag under certain conditions. Since we’re adding a layer of UI on top of the terminal, we wanted to be sure we chose a stack that would allow us to be in the upper echelon of terminals in terms of speed even while rendering more complicated UI elements.
There are quite a few points during the process of outputting text to the terminal screen that can be potential performance bottlenecks for a terminal. A few include:
- Reading from the pseudoterminal: Reading from the pseudoterminal (see the Implementing Blocks section for more context on what a pseudoterminal is) and parsing ANSI escape sequences can be expensive, especially if there is a program running that prints a lot of output to the screen (such as
cating a large file) - Rendering: Depending on the implementation, actually rendering pixels onto the screen can be expensive. If the terminal has output that is constantly changing, this can very quickly cause a terminal to feel laggy and be under 60fps.
- Scrolling: Once the terminal viewport is full, new lines that are printed out to the terminal require the previous lines to be scrolled up before re-rendering. Scrolling speed often scales with the number of visible lines in the viewport.
The diagram below shows the output of vtebench for scrolling in various terminals. For some reason Hyper generally could not handle running the benchmarks at all and did not terminate after a reasonable amount of time.
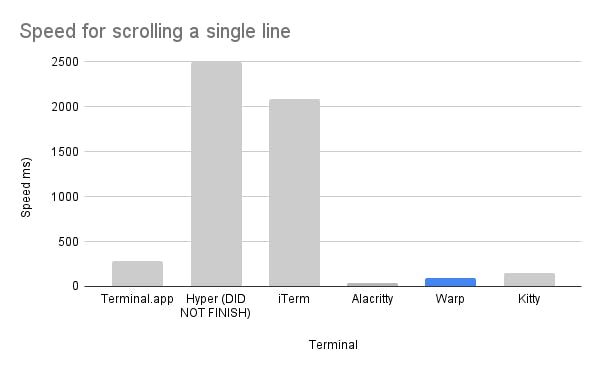
Speed for scrolling a single line in various terminal. This was computed by running the scrolling test from vtebench in various terminals at the same window size. For some reason Hyper generally could not handle running the benchmarks at all and did not terminate after a reasonable amount of time
After a very brief experiment with Electron, we quickly pivoted to building in Rust and rendering directly on the GPU using Metal (Mac’s GPU API). As a low-level systems language, Rust was appealing because of its speed and also its strong developer community: using crates.io for package management was a breeze and our entire team (none of whom had written Rust before) onboarded very quickly with tools like Rustlings. More importantly, Rust has a pretty extensive platform support--allowing us to write in a single language and then build for Mac, Linux, Windows, and ultimately the web by compiling to WASM.
Why Render on the GPU?
Most applications that you use are rendered on the CPU using standard OS frameworks to render. For example, MacOS provides APIs to its Core Graphics framework to render items like shapes and arbitrary paths directly on the CPU. Rendering on the CPU is relatively simple because of these high level APIs for drawing and can be pretty fast for 2D graphics and text. Rendering on the GPU is typically much lower level (there are no equivalent APIs for rendering shapes or text) but performs well for 3D graphics or any task that requires high throughput.
Interestingly, GPU-accelerated rendering for terminals has become fairly standard recently (iTerm, Hyper, Kitty, and Alacritty all support it). It may seem that rendering on the CPU would be better suited since it’s mostly just text and 2D shapes that are being rendered. However, terminal rendering is more complex now than it was in the 80s. Terminals today need to be able to render high resolution text on a 4K display and possibly at a very high FPS since some displays run at 240hz or even higher.
Efficient use of a GPU renderer (minimizing state changes between two frames, rasterizing glyphs only once, and minimizing the number of draw calls) can push rendering on the GPU to 400+ fps, which typically isn’t possible using a CPU renderer.
Eliminating as many software and architectural bottlenecks on the CPU allows us render at well over 144fps, even on a 4K monitor. We chose Metal over OpenGL as our GPU API since we knew we were going to target MacOS as our first platform. The Metal debugging tools in Xcode are excellent, allowing us to inspect texture resources and easily measure important metrics like frame rate and GPU memory size.

But how do you render arbitrary UI elements on the GPU?
Supporting arbitrary UI elements on the GPU is tricky. Rendering on the GPU with Metal is very low level, the API essentially only allows to render triangles using a vertex and fragment shader or to sample from a texture to render images.
The key insight here is that for Warp the only thing we needed to render is rectangles, images, and glyphs (which are often rendered via a texture atlas). Making use of this insight drastically reduced the complexity of using Metal: we built shaders for each of these primitives in around 200 lines of code and don’t need to touch the shaders when adding new UI components since they are composed of these primitives.
However, we still needed a higher level of abstraction to render UI elements on top of the characters rendered as part of the terminal output. The lack of a stable UI framework for Rust has been a known issue for a while (see areweguiyet.com) and the available options get even more bare if you want to support Metal as the rendering backend. Options we considered were Azul and Druid, however both were still very experimental at the time and didn’t support Metal (Druid doesn’t have any GPU rendering backend yet and Azul only supports OpenGL).
Given the lack of stable options, we decided to build our own UI framework in Rust, which essentially amounted to building the architecture of a browser. Though this would have been a significant engineering hit to build this from scratch, we partnered with Nathan Sobo, co-founder of the Atom text editor, who had already started building a Rust UI framework that was loosely inspired by Flutter. We use this UI framework to build an element tree for our app that we can then render using various rendering backends (for now just Metal, but we plan to add OpenGL and WebGL as we support more platforms).
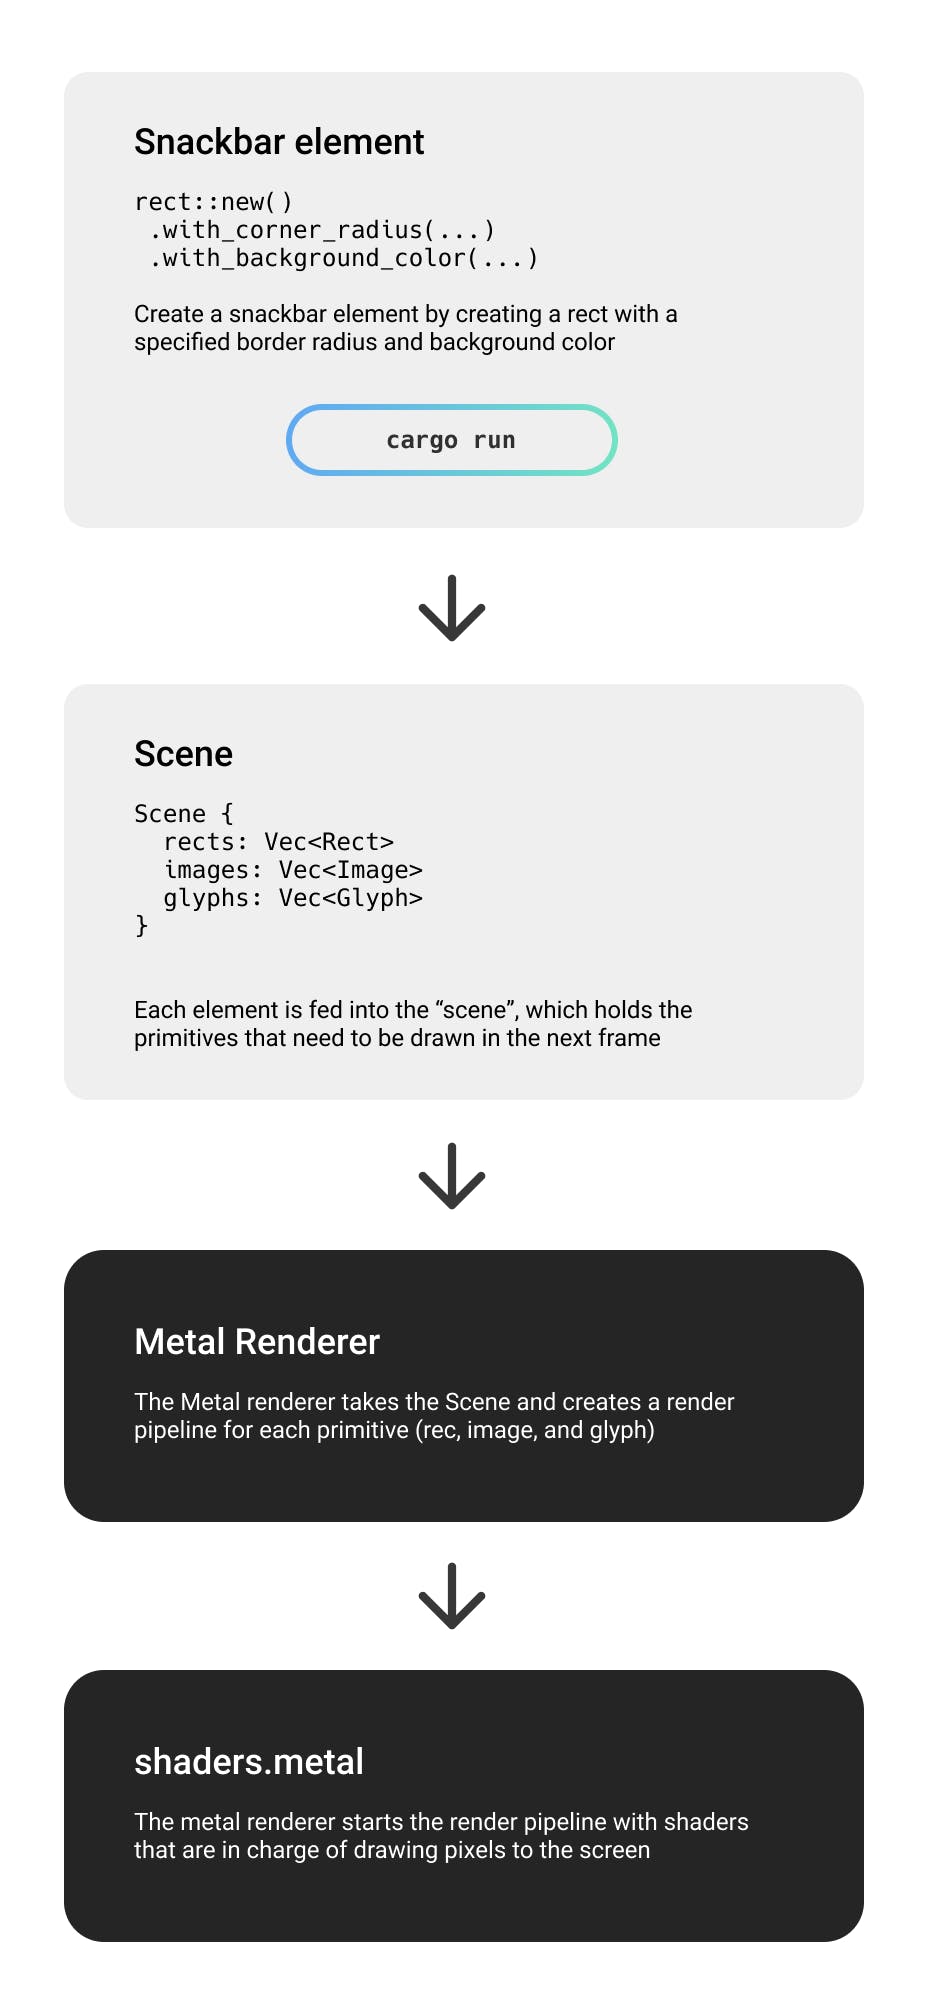
At the rendering level, we started by building primitive abstractions (such as a rect, image, and glyph) that we render in Metal. We compose these abstractions to build higher level elements such as a snackbar, a context menu, or a block. We expect this separation between elements and the actual GPU pipeline to serve us well as we support more platforms that don’t support Metal: all we need to do is reimplement these primitives (<250 lines of shader code) in the respective GPU API while leaving our elements and anything higher in the stack untouched. We hope to open source this UI framework as we iterate on it, we already think it’s a capable framework for rendering in Rust.
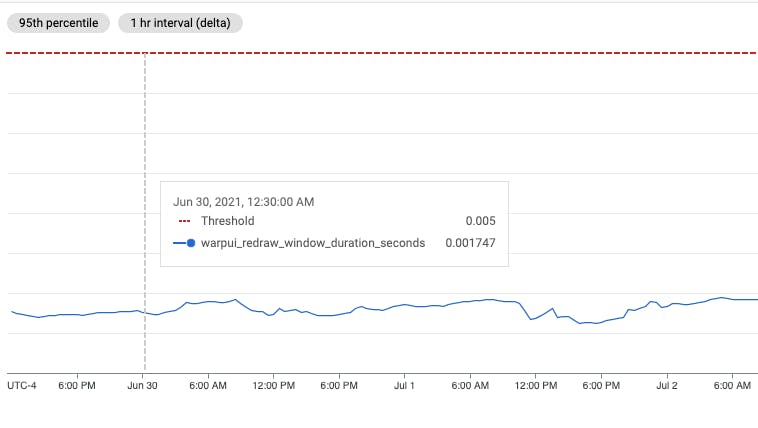
Rendering on the GPU has been fruitful thus far: even with many UI elements and a lot of terminal output we are still able to render > 144 FPS. For example, over the past week the average time to redraw the screen in Warp was only 1.9 ms!
Implementing Blocks
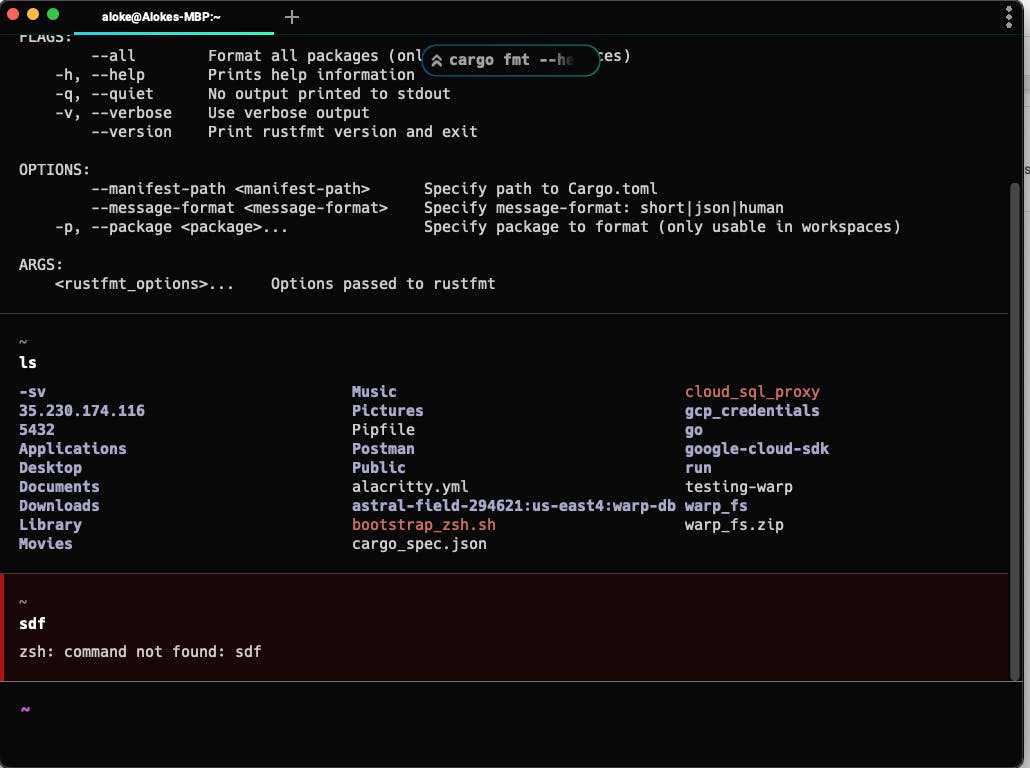
The reason you don’t see a feature like blocks (with the exception of Upterm) in most other terminals is because the terminal has no concept of what program is running, or really of anything that’s happening within the shell. At a high level, a terminal reads and writes bytes from a pseudoterminal to interact with the shell. This technology is very antiquated--the shell essentially thinks it is interacting with a physical teletype terminal even though they haven’t been used in practice in over 30 years!
A terminal implements the VT100 spec, which is used to communicate information from the shell to the terminal. For example if the shell wants to tell the terminal to render text red, bold, and underline it would send the following escape code, which the terminal then parses and renders with the appropriate styles:
\033[31;1;4mHello\033[0m
https://stackoverflow.com/questions/4842424/list-of-ansi-color-escape-sequences covers how colors are represented via escape sequences very well. It’s also just generally one of my favorite stackoverflow answers--make sure to read the interlude!
Given all the terminal sees is characters in and characters out, trying to determine when a command is run is next to impossible using just the characters from the pseudoterminal.
Thankfully, most shells provide hooks for before the prompt is rendered (zsh calls this precmd) and before a command is executed (preexec). Zsh and Fish have built in support for these hooks. Though bash does not have built in support for these hooks, scripts like bash-preexec exist to mimic the behavior of other shells. Using these hooks, we send a custom DCS (Device Control String%2C,for%20a%20device%20control%20string.)) from the running session to Warp. This DCS contains an encoded JSON string that includes metadata about the session that we want to render. Within Warp we can parse the DCS, deserialize the JSON, and create a new block within our data model.
Data Model
The VT100 spec represents the viewport in terms of rows and columns which naturally leads to most terminals using a grid as their internal data model. We started by forking Alacritty’s model code, which was well suited for us because it was already written in Rust and is tailored to be as performant as possible. Nathan Lilienthal and Joe Wilm, two of the maintainers of Alacritty, were early supporters of Warp and were extremely gracious in reviewing early design docs and providing their technical expertise.
We quickly realized, however, that a single grid would not work for building a feature like blocks: separating commands from each other requires ensuring that terminal output is actually written on separate lines of a grid and can’t be overwritten by output from another command. Neither of these can be guaranteed by the VT100 spec. For example, consider a command like
bash-5.1$ printf "hello"
hellobash-5.1$
Here printf "hello" output the text "hello", but no newline was inserted, so the prompt for the next command was inserted on the same line. Similarly, escape sequences exist that allow moving the cursor up within the visible screen by n rows, allowing any command to overwrite any command that was already executed. With a traditional grid data model, we wouldn’t be able to support the case where a single line had the command from one block and the output from another. We also didn’t want the output from one command to be able to overwrite the contents from a previous block.
To fix these issues, we create a separate grid for each command and output based on the precmd/preexec hooks we receive from the shell. This level of grid isolation ensures we can separate commands and their output without having to deal with the output of one command overwriting that of another. We found this approach to be a good balance of being faithful to the VT100 spec and using the existing Alacritty grid code with rendering blocks in a more flexible way that was traditionally prescribed by a teletype terminal. This model gives us more flexibility for implementing features for a single block that are traditionally for an entire terminal grid. For example, searching per block and copying the command/output separately are trivial to implement if our model separates each command and output into their own submodel.
Input Editor

Together with Nathan Sobo, we built a full-fledged text editor as our input editor as an editor view in our framework. Building this as a full text editor unblocked features like multiple cursors and selections within the editor and also will let us use the editor as the default editor within the shell if we ever want to support it.
Because we built our own command line editor, we had to re-implement all the existing shortcuts users are used to while editing (such as up arrow, ctrl-r, and tab completion) while also balancing implementing new modern shortcuts like Move Cursor By Word or Select All that previously didn’t exist in the shell line editor. We built an action dispatching system into our framework that can be triggered based on keybindings so implementing all these shortcuts was relatively trivial. This also made it easy to enable/disable various shortcuts depending on the state of the app: for example “ctrl-r” for searching previous commands should only be enabled if the input editor is visible.
Building the editor also heavily relied on a SumTree, a custom data structure that is essentially a Rope) that can hold generic types and can index the type on multiple dimensions.
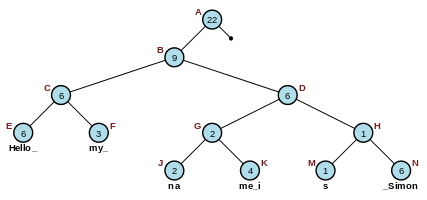
Like many text editors, we use the SumTree to hold the contents of our buffer. We also use the SumTree for transformations of the editor that don’t affect the underlying buffer contents (such as code folding, holding unselectable and uneditable annotations, etc). Representing transformations as a SumTree allows us to efficiently query for both the buffer text and the display text at any given point in the editor. We also use SumTrees to keep track of the operations (or edits) on the buffer. We intentionally designed our editor to be an Operation-based CRDT from the start, so that we can support real-time collaboration within the editor.
Looking Forward
Looking forward, our stack opens up the ability to realize our full vision of what Warp can be. By choosing Rust and building a UI framework that is rendering-platform agnostic, we can easily scale to other platforms and even the web by compiling to WASM (a mistake we made was to not think about which crates will and won’t compile to WASM early on) and rendering with WebGL.
One feature that the web rendering enables is real-time collaboration. You can share a secure link to your teammate to debug issues in real-time https://github.com/warpdotdev/warp/issues/2.
We can also leverage the “Blocks” model to enable users to search history by more than just the command: https://github.com/warpdotdev/warp/issues/1.
Our precmd and preexec hooks also provide the necessary technical foundation for Environment variable sharing: https://github.com/warpdotdev/warp/issues/3.
* Edit: When we published this post, we had not set up our Github issues yet. We have since transferred the technical implementation details to Github.*
Conclusion
Performance is one of our most important features--it’s a feature most users won’t notice on a day-to-day basis but it makes a huge difference in building a quality product for the end user.
If you’re interested in learning more, please check out our site and request early access to our beta here. We are still in the early days of implementing our vision but would love your feedback and input as we move forward!
